- 浏览: 1382761 次
-

文章分类
最新评论
-
dl3399:
一直期待qt中引入v8,毕竟现在qt的js引擎库好多js都不能 ...
V8 初次接触(Qt5) -
lzy5425:
但是Qt在C++方面发展却让人担忧
Qt5 结构及模块组成? -
ztt123:
你好,请问怎么用MD5自动生成序号?
关于生成不重复序号的问题
Red Hat Enterprise5.4下cacti的安装和配置
Red Hat Enterprise5 安装 cacti-0.8.7g/插件/模板的详细安装过程
目录:
一、什么是cacti?
二、cacti的官方网站在哪里?
三、在哪里下载?需要哪些组件的支持?
四、使用cacti需要什么知识?
五、如何安装cacti?
六、常见问题
一、什么是Cacti?
无论是稍有规模的IT公司还是大型的ICP、ISP,都需要面对一个问题,就是如何实现对网络和服务器的性能的实时监测。
Cacti是一套基于PHP,MySQL,SNMP及RRDTool开发的网络流量监测图形分析工具。它通过snmpget来获取数据,使用 RRDtool绘画图形,能统计网络设备的流量、CPU、系统负载等参数,也可以自定义监测的指标。而且你完全可以不需要了解RRDtool复杂的参数。 它提供了非常强大的数据和用户管理功能,可以指定每一个用户能查看树状结构、host以及任何一张图,还可以与LDAP结合进行用户验证,同时也能自己增 加模板,功能非常强大完善,界面友好。虽然 MRTG 是一套非常好用的软件但是它毕竟是一套很旧的软件了,其作者在多年前已经开发出 RRDTool 代替该软件(RRDTool与MRTG对比), 现在已经发展的很成熟了,但由于 RRDTool 的指令非常复杂,对于使用者非常的麻烦,幸运的是有一套软件 Cacti 的发展就是基于让 RRDTool 使用者更方便使用该软件,除了基本的 Snmp 流量跟系统资讯监控外,Cacti 也可外挂 Scripts 及加上 Templates 来作出各式各样的监控图。
二、cacti的官方网站在哪里?
# rpm -qa|grep -i mysql //查看已经安装的mysql相关包 #cd mysql-5.1.54 #make #make install #cp support-files/my-medium.cnf /etc/my.cnf
修改mysql目录的所有权限,使mysql用户和组可以访问到相关的目录,并创建mysql执行文件的快捷方式。 # useradd mysql //添加mysql用户 #cd /usr/local/mysql #chown -R mysql:mysql . //改变目录的所有权 #bin/mysql_install_db --user=mysql //初始化授权表 #chown -R root . #chown -R mysql var #bin/mysqld_safe --user=mysql & //启动mysql
将 mysql 注册为 Linux 系统服务 #cd - //即回到mysql-5.1.54目录 #chmod a+x /etc/rc.d/init.d/mysqld #chkconfig --add mysqld # chkconfig --level 2345 mysqld on
修改MySQL的最大连接数 # vi /etc/my.cnf //对mysql配置文件进行修改
http://www.cacti.net
三、在哪里下载?需要哪些组件的支持?
cacti在http://www.cacti.net/download_cacti.php处可以下载,总体来说需要很多软件的需要:Mysql、PHP、Apache、Zlib、libpng、freetype、jpeg、fontconfig、libxml、rddtool、net-snmp,不过不用担心这些软件在下文中都提供了下载地址。
四、使用cacti需要什么知识?
需要具有一定的使用net-snmp和rrdtool的知识。如果要自定义监测的指标还需要一定的shell脚本或xml语言能力。如果你想帮助cacti的开发,则需要通晓php脚本。
五、如何安装cacti?
闲话少说,下面开始安装前的准备工作。所有的软件包都请下载到这里/usr/local/_temp,软件都安装在/usr/local目录下。
1)安装Mysql (mysql-5.1.54.tar.gz)
如果已经安装了MySQL,先卸载以前安装的mysql包(rpm更多命令)
# rpm -ev mysql //删除mysql
# rm -f /etc/my.cnf //删除/etc/my.cnf下面的MySQL配置文件避免影响新安装版本的启动。
# tar -zxvf mysql-5.1.54.tar.gz //解压 Mysql 安装包
./configure –prefix=/usr/local/mysql
# groupadd mysql //添加mysql用户组
# /usr/local/mysql/bin/mysql_install_db --user=mysql //初始化授权表
#cp support-files/mysql.server /etc/rc.d/init.d/mysqld
将下面的代码放到my.cnf文件中
[mysqld]
set-variable=max_connections=1000 #设置最大连接数为1000
set-variable=max_user_connections=500 #设置每用户最大连接数为500
set-variable=wait_timeout=200 #表示200秒后将关闭空闲(IDLE)的连接,但是对正在工作的连接不影响。
保存并退出编辑的my.cnf文件
启动mysql服务
# service mysqld start
注意:在安装mysql的过程中可能会出现以下问题
checking for termcap functions library... configure: error: No curses/termcap library found
解决方法:
安装ncurses-5.7.tar.gz包
注意:service mysqld start启动时可能出现问题
mysqld: unrecognized service
cp /usr/local/mysql/support-files/mysql.server /etc/rc.d/init.d/mysqld
chmod a+x /etc/rc.d/init.d/mysqld
chkconfig --add mysqld
2)安装Apache(httpd-2.2.17.tar.bz2)
|
# tar -zxvf httpd-2.2.17.tar.bz2 |
说明:
--enable-so //让Apache可以支持DSO模式,注意,这里采用的是Apache2.0的语法。如果你的Apache是1.3版本,应改为--enable-module=so。
--enable-mods-shared=most //告诉编译器将所有标准模块都编译为DSO模块。你要是用的是Apache1.3,改为--enable-shared=max就可以。
--enable-rewrite //支持地址重写功能,使用1.3版本的朋友请将它改为--enable-module=rewrite。
|
# make |
对下面的内容在httpd.conf中进行查找和修改
DirectoryIndex index.php index.html //修改默认启动页
DocumentRoot "/var/www/html/cacti" //指定主目录(/usr/local/apache2/htdocs)
ServerName localhost:80
查找AddType application/x-compress .Z
在其下加入 AddType application/x-tar .tgz
AddType application/x-httpd-php .php
AddType image/x-icon .ico
在rc.local上加入一行/usr/local/apache/bin/apachectl –k start,系统启动时启动Apache服务。
|
# vi /etc/rc.d/rc.local |
将 apache 注册为 Linux 系统服务(chkconfig的更多命令)
|
# cp /usr/local/apache/bin/apachectl /etc/rc.d/init.d/httpd #chkconfig --level 345 httpd on
注意:可能出现的问题 # chkconfig --add httpd service httpd does not support chkconfig httpd服务不支持 chkconfig。需要编辑/etc/rc.d/init.d/httpd,添加以下注释信息:
|
3)安装PHP(php-5.3.5.tar.bz2)
先安装zlib,freetype,libpng,jpeg以便于让PHP支持GD库(Cacti的WeatherMap插件必须要较新GD库的支持)
3).i).安装zlib(zlib-1.2.3.tar.gz)
|
# cd /usr/local/_temp |
3).ii).安装libpng(libpng-1.2.18.tar.gz)
|
# tar -zxvf libpng-1.2.18.tar.gz
【出错的话:collect2: ld returned 1 exit status make: *** [pngtest] Error 1 可以直接编译./configure –prefix=/usr/local/libpng】 |
注意,这里的makefile不是用./configure生成,而是直接从scripts/里拷一个
3).iii).安装freetype(freetype-2.3.5.tar.gz)
|
# tar -zxvf freetype-2.3.4.tar.gz |
3).iv).安装jpeg(jpegsrc.v6b.tar.gz)
|
# tar -zxvf jpegsrc.v6b.tar.gz |
注意,这里configure一定要带--enable-shared参数,不然,不会生成共享库
注意:可能会出错
make: ./libtool: Command not found
make: *** [jcapimin.lo] Error 127
解决办法:下载libtool安装【libtool-2.2.6a.tar.gz】
tar --zxvf libtool-2.2.6a.tar.gz
cd libtool-2.2.6a.tar.gz
./configure --prefix=/usr/local/libtool
make && make install
==================
#cd jpeg-6b
cp /usr/share/libtool/config.sub .
#cp /usr/share/libtool/config.guess .
3).v).安装Fontconfig(fontconfig-2.4.2.tar.gz)
|
# tar -zxvf fontconfig-2.4.2.tar.gz
注意: 问题一: checking for LIBXML2... configure: error: Package requirements (libxml-2.0 >= 2.6) were not met:
解决方案:报错的话,应该需要安装libxml2-2.6.32.tar.gz 如果还有错误的话 确定 /usr/local/libxml2/lib/pkgconfig 目录下有 libxml-2.0.pc
另外出现问题: make编译不成功 make[3]: *** [fc-case.o] Error 1 make[3]: Leaving directory `/usr/local/_temp/fontconfig-2.4.2/fc-case' make[2]: *** [all] Error 2 make[2]: Leaving directory `/usr/local/_temp/fontconfig-2.4.2/fc-case' make[1]: *** [all-recursive] Error 1 make[1]: Leaving directory `/usr/local/_temp/fontconfig-2.4.2' make: *** [all] Error 2 解决: ./configure --with-freetype-config=/usr/local/freetype/bin/freetype-config
|
3).vi).安装GD(gd-2.0.35.tar.gz)
|
# tar -zxvf gd-2.0.35.tar.gz
|
编译成功后会显示以下信息** Configuration summary for gd 2.0.35:
Support for PNG library: yes
Support for JPEG library: yes
Support for Freetype 2.x library: yes
Support for Fontconfig library: yes
Support for Xpm library: no
Support for pthreads: yes
注意:make过后会出现错误
configure.ac:64: error: possibly undefined macro: AM_ICONV
If this token and others are legitimate, please use m4_pattern_allow.
See the Autoconf documentation.
make: *** [configure] Error 1
make[2]: *** [gd_png.lo] Error 1
make[2]: Leaving directory `/usr/local/_temp/gd-2.0.35'
make[1]: *** [all-recursive] Error 1
make[1]: Leaving directory `/usr/local/_temp/gd-2.0.35'
make: *** [all] Error 2
=====================================================
解决方法:
下载gettext-0.18.tar.gz
/usr/lib/libncurses.a: could not read symbols: Bad value
collect2: ld returned 1 exit status
make[4]: *** [libgettextlib.la] Error 1
make[4]: Leaving directory `/usr/local/_temp/gettext-0.18.1.1/gettext-tools/gnulib-lib'
make[3]: *** [all] Error 2
make[3]: Leaving directory `/usr/local/_temp/gettext-0.18.1.1/gettext-tools/gnulib-lib'
make[2]: *** [all-recursive] Error 1
make[2]: Leaving directory `/usr/local/_temp/gettext-0.18.1.1/gettext-tools'
make[1]: *** [all] Error 2
make[1]: Leaving directory `/usr/local/_temp/gettext-0.18.1.1/gettext-tools'
make: *** [all-recursive] Error 1
解决办法 ,编译加m4_pattern_allow参数
即:./configure --enable-m4_pattern_allow
便能顺利编译安装
#################################################
如果出现下面错误:
gd_png.c:825: warning: data definition has no type or storage class
make[2]: *** [gd_png.lo] Error 1
修复方法:
CPPFLAGS="-I/usr/local/libpng/include" ./configure --prefix=/usr/local/libgd --with-png=/usr/local/libpng/ --with-freetype=/usr/local/freetype --with-jpeg=/usr/local/libjpeg --with-fontconfig=/usr/local/fontconfig/
#################################################
3).vii).编辑/etc/ld.so.conf文件,添加以下几行到此文件中。
|
# vi /etc/ld.so.conf |
/usr/local/zlib/lib
/usr/local/freetype/lib
/usr/local/libjpeg/lib
/usr/local/libgd/lib
添加:/usr/local/mysql/lib
|
# ldconfig -v //并执行ldconfig命令,使用动态装入器装载找到共享库 |
3).viii).安装libxml(libxml2-2.7.8.tar.gz)
|
# tar -zxvf libxml2-2.6.32.tar.gz |
3).ix).安装php(php-5.3.5.tar.bz2)
|
# tar -jxvf php-5.2.10.tar.bz2 |
|
注意:该版本去掉--with-ttf,不支持
注意:如果提示错误,说不支持snmp,我们可以先安装net-snmp,然后再指定路径 --with-snmp=/usr/local/net-snmp
注意:安装完成后可能会出现错误提示: /usr/local/zlib/lib/libz.a: could not read symbols: Bad value collect2: ld returned 1 exit status make: *** [libphp5.la] Error 1 解决办法: cd zlib-1.2.3 //进入zlib目录
|
说明:
--with-apxs2=/usr/local/apache/bin/apxs //这是加入apache中为DSO模块的位置
--with-mysql=/usr/local/mysql //支持MySQl
--with-gd=/usr/local/libgd //支持GD库
--enable-gd-native-ttf //激活对本地 TrueType 字符串函数的支持
--with-ttf //激活对 FreeType 1.x 的支持
--enable-gd-jis-conv //使JIS-mapped可用,支持日文字体
--with-freetype-dir=/usr/local/freetype //激活对 FreeType 2.x 的支持
--with-jpeg-dir=/usr/local/libjpeg //激活对 jpeg-6b 的支持
--with-png-dir=/usr //激活对 png 的支持
--with-zlib-dir=/usr/local/zlib //激活对zlib 的支持
--enable-xml //支持XML
--enable-mbstring //激活mbstring模块
--enable-sockets //支持套接字
--with-snmp //支持snmp
--enable-short-tags //支持PHP的短标记
|
# make
注意:在make & make install后会出现以下情况: /usr/local/net-snmp/lib/libnetsnmp.a: could not read symbols: Bad value collect2: ld returned 1 exit status make: *** [libphp5.la] Error 1 解决方案: 可以先安装snmp协议,并且指定他的目录
注意:后面安装php后可能要修改配置文件 Vim /usr/local/apache/htdocs/conf/httpd.conf 添加: LoadModule php5_module modules/libphp5.so
|
注意:由于php的版本比较高,安装过程中海可能遇到一些问题,比如说测试的时候,可能代码得改成<?php
phpinfo();
?>
另外还可能遇到一些关于时间的问题,我们都可以在网上找到解决的办法
4).安装RRDTool(rrdtool-1.2.23.tar.gz) 【rrdtool-1.4.5.tar.gz】
由于rrdtool-1.2.23需要一些库文件支持,故需先安装配置支持的环境,然后编译安装。直接运行以下bash脚本就可以完成安装:
注 意:将cgilib-0.5.tar.gz、zlib-1.2.8.tar.gz、libpng-1.2.18.tar.gz、freetype- 2.1.9.tar.gz、libart_lgpl-2.3.17.tar.gz、rrdtool-1.2.23.tar.gz放到/root/rrdtool-1.2.2目录下,将脚本保存为/root/rrdtool-1.2.2/rrdtoolinstall.sh,并给执行权 限chmod u+x /root/rrdtool-1.2.2/rrdtoolinstall.sh。
以下链接是我重新打好的一个rrdtool-1.2.23的安装包,里面包括了所有用到的库文件和安装脚本,下载解压后执行脚本sh rrdinstall.sh即可以完成RRDTool的安装。
|
#!/bin/sh BUILD_DIR=/root/rrdtool-1.2.11 INSTALL_DIR=/usr/local/rrdtool cd $BUILD_DIR tar zxf cgilib-0.5.tar.gz cd cgilib-0.5 make CC=gcc CFLAGS="-O3 -fPIC -I." mkdir -p $BUILD_DIR/lb/include cp *.h $BUILD_DIR/lb/include mkdir -p $BUILD_DIR/lb/lib cp libcgi* $BUILD_DIR/lb/lib
cd $BUILD_DIR tar zxf zlib-1.2.2.tar.gz cd zlib-1.2.2 env CFLAGS="-O3 -fPIC" ./configure --prefix=$BUILD_DIR/lb make make install
cd $BUILD_DIR tar zxvf libpng-1.2.8-config.tar.gz cd libpng-1.2.8-config env CPPFLAGS="-I$BUILD_DIR/lb/include" LDFLAGS="-L$BUILD_DIR/lb/lib" CFLAGS="-O3 -fPIC" / ./configure --disable-shared --prefix=$BUILD_DIR/lb make make install
cd $BUILD_DIR tar zxvf freetype-2.1.9.tar.gz cd freetype-2.1.9 env CPPFLAGS="-I$BUILD_DIR/lb/include" LDFLAGS="-L$BUILD_DIR/lb/lib" CFLAGS="-O3 -fPIC" / ./configure --disable-shared --prefix=$BUILD_DIR/lb make make install
cd $BUILD_DIR tar zxvf libart_lgpl-2.3.17.tar.gz cd libart_lgpl-2.3.17 env CFLAGS="-O3 -fPIC" ./configure --disable-shared --prefix=$BUILD_DIR/lb make make install
IR=-I$BUILD_DIR/lb/include CPPFLAGS="$IR $IR/libart-2.0 $IR/freetype2 $IR/libpng" LDFLAGS="-L$BUILD_DIR/lb/lib" CFLAGS=-O3 export CPPFLAGS LDFLAGS CFLAGS
cd $BUILD_DIR tar zxf rrdtool-1.2.11.tar.gz cd rrdtool-1.2.11 ./configure --prefix=$INSTALL_DIR --disable-python --disable-tcl && make && make install
|
|
# ln -s /usr/local/rrdtool/bin/* /usr/local/bin/ //完成后建立符号连接 |
错误:vim ~/.bashrc
PKG_CONFIG_PATH=/usr/local/libxml2/lib/pkgconfig:/usr/local/lib/pkgconfig
5).安装net-snmp(net-snmp-5.6.tar.gz)
|
# tar -zxvf net-snmp-5.6.tar.gz |
以下是我的snmpd.conf配置##########################################
# sec.name source community
com2sec local localhost public
##########################################
|
# /usr/local/net-snmp/sbin/snmpd //启动SNMP服务
注意:有的写得是 /usr/local/net-snmp/sbin/snmpd–c /usr/local/net-snmp/share/snmp/snmpd.conf &
|
注意:snmpwalk-v2c-cpubliclocalhostsystem
非必须:
cacti-spine是一个用C语言开发的、用来替换默认的cmd.php的、能够快速获取数据的引擎。
cacti-spine要用到mysql的头文件,因此事先需要安装mysql-devel包,如果是非rpm安装,则需要在configure时使用--with-mysql选项指定mysql的安装位置。
# tar zxvf cacti-spine-0.8.7e.tar.gz
# cd cacti-spine-0.8.7e
# aclocal
# libtoolize --force
# autoheader
# autoconf
# automake
# ./configure --prefix=/usr/local/spine --with-mysql=/usr/local/mysql –with-snmp=/usr/local/net-snmp
# make
# make install
安装后,要对配置文件进行修改
cp /usr/local/spine/etc/spine.conf.dist /usr/local/spine/etc/spine.conf 建立spine的配置文件
vim /usr/local/spine/etc/spine.conf【检查数据库名、用户名等】
DB_Host localhost
DB_Database cacti
DB_User cacti
DB_Pass cacti
DB_Port 3306
验证spine是否正常
/usr/local/spine/bin/spine
显示结果:
SPINE: Using spine config file [../etc/spine.conf]
SPINE: Version 0.8.7g starting
SPINE: Time: 2.2117 s, Threads: 1, Hosts: 3
=============================================
6).安装cacti(cacti-0.8.7g.tar.gz)
|
# tar -zxvf cacti-0.8.7g.tar.gz |
config.php文件中需要修改的内容$database_type = "mysql";
$database_default = "cacti";
$database_hostname = "localhost";
$database_username = "cacti";
$database_password = "cacti";
$database_port = "3306";
|
# vi /usr/local/apache/ htdocs /include/global.php |
global.php文件中修改的内容$database_type = "mysql";
$database_default = "cacti";
$database_hostname = "localhost";
$database_username = "cacti";
$database_password = "cacti";
$database_port = "3306"; 我用http://serverip来访问cacti所以不用修改下面行
如果你用http://serverip/cacti/访问cacti应将下面行修改为:$config['url_path'] = '/cacti/';
global.php文件中的内容$config['url_path'] = '/';
|
# useradd cacti //添加cacti用户 |
|
# su cacti //为cacti用户添加cron任务 |
正确输出类似于下面内容OK u:0.01 s:0.02 r:21.42
OK u:0.01 s:0.02 r:21.42
OK u:0.01 s:0.02 r:21.42
OK u:0.01 s:0.02 r:21.42
10/21/2008 01:48:41 PM - SYSTEM STATS: Time:30.5831 Method:cmd.php Processes:3 Threads:N/A Hosts:19 HostsPerProcess:7 DataSources:401 RRDsProcessed:220
|
# mysql -uroot -p //登录mysql 配置cacti数据库 |
在游览器输入 http://serverip/cacti
默认用户名:admin 密码:admin
设置cacti用到的命令路径snmpwalk Binary Path /usr/local/bin/snmpwalk
snmpget Binary Path /usr/local/bin/snmpget
snmpbulkwalk Binary Path /usr/local/bin/snmpbulkwalk
snmpgetnext Binary Path /usr/local/bin/snmpgetnext
RRDTool Binary Path /usr/local/bin/rrdtool
RRDTool Default Font Path
PHP Binary Path /usr/local/bin/php
Cacti Log File Path /usr/local/apache/ htdocs /cacti/log/cacti.log
Spine Poller File Path
8).安装插件 # unzip cacti-plugin-arch.zip
注意:在此需要修改config.php 中的内容才能正确访问 将$url_path = "/";改成$url_path = "/cacti/";
要安装别的插件前,先要安装cacti的一个patch--Plugin Architecture,才能支持插件
PA和cacti版本的关系
PA 1.0 = cacti 0.8.6i
PA 1.1 = cacti 0.8.6i et 0.8.6j
PA 2.0 = cacti 0.8.7b
PA 2.2 = cacti 0.8.7c
PA 2.4 = cacti 0.8.7d
PA 2.5 = cacti 0.8.7e
PA 2.8 = cacti 0.8.7g
8).i).安装 cacti-plugin-arch.zip
# cp -R cacti-plugin-arch/* /usr/local/apache/htdocs/cacti/ //复制插件需要的文件到cacti
# cd /usr/local/apache/htdocs/cacti/
# mysql -ucacti -p cacti < pa.sql //导入插件的脚本
# patch -p1 -N < cacti-plugin-0.8.7g-PA-v2.8.diff

进入"用户管理"->点admin->区域权限->Plugin Management
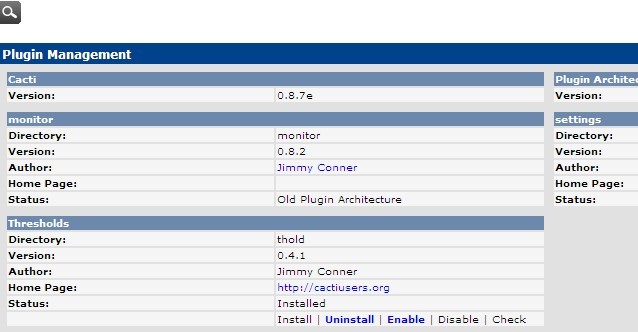
安装settings,thold,monitor插件 # vi /var/www/html/cacti/include/global.php # cp teMySQLcacti/mysql_stats.php /var/www/html/cacti/scripts
将monitor、settings、thold解压到/var/www/html/cacti/plugins目录
修改/var/www/html/cacti/include/global.php,将插件名字添加到数组
global.php文件中的内容$plugins = array();
//$plugins[] = 'thold';
$plugins[] = 'thold';
$plugins[] = 'monitor';
$plugins[] = 'settings';
使用thold插件
注:在写本文时使用的cacti 0.8.7e最新版,比以往版本有些变化,目前插件官司网上提供的monitor0.8.2和setting0.5并不支持cacti 0.8.7e,在此就不多介绍monitor和setting的使用。
1> 打开“Console->Settings->Alerting/Thold”,可以调整Thold的各项配置。例如:“Dead Host Notifications Email”处可填写设备当机时发送警告信息到哪个邮箱;勾选“Send alerts as text”项,可以设置只发送文本格式的邮件。
2>打开“Templates->Threshold Templates”,可以添加、取出需要关联到预警系统的模板,例如:可以添加和“Interface-Traffic”模板的关联,选择 “traffic_in”、“traffic_out”数据项,分别设置警告阈值“High Threshold”(如200000000比特/秒);可以添加和“Unix-Disk Space”模板的关联……。
3>打开“Create->New Graphs”,选择需要提供预警的设备,单击右侧上方的“Auto-create thresholds”创建预警项目。
4>打开“Management->Thresholds”,可以管理已经创建的预警项目。
附: 按照官方文档安装了plugin architecture和settings、thold等plugins但是web页面里仍没什么变化,后来访问了下plugins.php,系统报没 有权限,然后直接点”login”直接就进系统了,由此可见不是没有权限,而应该是没有特定的权限,后来进入用户设置界面”User Management”将所用的用户点开,发现有个”plugin management”的权限没选中,选中,再Save,再回来刷页面,果然,左边有了新的一项菜单:“Plugin Management”,点进去可以进行plugin的管理,搞定。
9).安装模板
本文只介绍安装mysql的模板(teMySQLcacti-20060810.tar.gz),其他的模板用户可以按此方式安装
按照官方文档中的3步
1. Put mysql_stats.php and dumpMemcachedStats.php in cacti/scripts/
本文只拷了mysql_stats
但其实tar本来就有cacti_host_template_temysql_host-step300-heartbeat600.xml
上面的步骤很多余
3. Import the .XML host using the cacti webinterface. Note,
上面3步安装好后,开始再按照官方文档产生图
GRAPH CREATION==============
0. Make sure you installed mysql_stats.php and dumpMemcachedStats.php.
1. Go to Management/Devices.
2. Add a new device.
3. Description can be whatever you want.
4. Hostname should resolve to IP of database machine.
5. Host template is teMySQL or memcached Host.
6. Now choose the "Create Graphs" link.
7. Highlight all graphs for the host (assuming you want them all).
8. Choose "Create"
9. A page will come up with several Password/Username pairs, fill them
all in with the cactipasswd/cactiuser you chose above. Hint: If you're
using Firefox, the second host you do this for you can just press down-
arrow twice, then tab, and the value will be filled in automatically
by the browser. The first time, I suggest typing in the username, copying
it, then doing a "paste-tab-tab-paste-tab-tab..." key combo until they're
all filled in, then repeat for the password. Painful, but doable.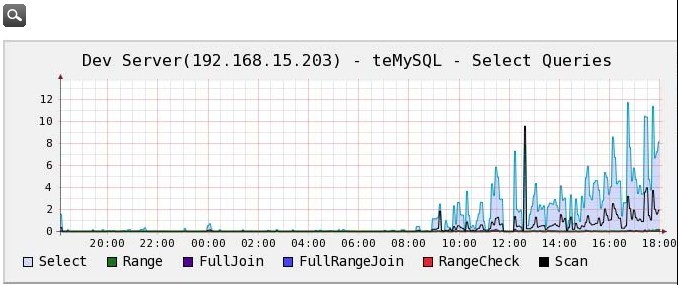
需要在被检测的mysql库里添加检测机器的权限(仅需要process权限): # rrdtool fetch yourRRDfile.rrd AVERAGE 看该文件的采集的数据,如果都是“nan”,那就是没有取到数据。 # snmpwalk -c community -v 2c hostIP if
grant process on *.* to username@192.168.1.1 identified by ‘password’;
flush privileges;
六、常见问题
1、为什么图像不能显示?
先确定你的IP地址、snmp comunite、snmp version等信息配置没有错误。
如果是在linux下安装cacti的话,可以按以下步骤检测:
1.1、cacti的data sources和Graph Management均有debug。看是否有错误,比如rrd文件找不到等。
1.2、data sources里看rrd文件的名称,然后到/cacti/rra目录中看是否有该文件存在。
1.3、如果有rrd文件存在,则可以使用
1.4、有可能是snmpget、snmpwalk和rrdtool的路径错误。
1.5、排除错误后,需要重新建立该监测点(graph)。
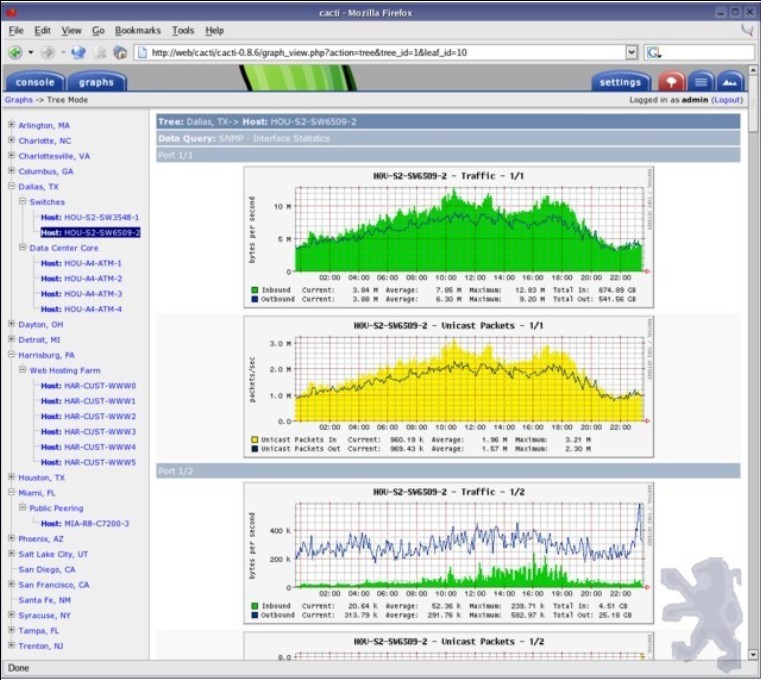
提示:每一个图像的文件均会保存为rra目录里的一个rrd为后缀的文件(可以在“Data Sources”中看到)。“Data Sources”和“Graph Management”中均可以进行debug,可以从debug中得出错误信息。
2、为什么rra目录下什么都没有?
2.1、请查看该目录的权限。该目录的权限应为cactiuser可以读写。
2.2、如果目录的权限没有问题,那么可能是snmp的设置有问题,请手工测试一下:
# snmpwalk -v 2c -c public yourIP if
如果有数据返回,则snmp的数据没有问题。如果出现“Timeout: No Response from ...”之类的错误信息则是snmp设置的问题。
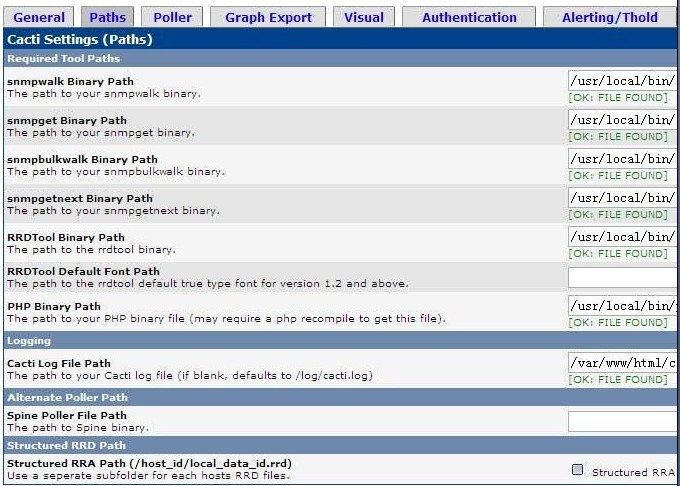
2.3、也可能是snmpwalk、snmpget和rrdtool的路径没有设置好在Settings-》Paths中检查设置是否正确。
修改后请重建该监测点!否则不生效。
3、可以取到本机(linux)的数据,但却不能取到远程主机的数据?
Cacti有很多模板,有的是用SNMP进行数据采集,有的是用shell脚本进行采集。如果没有特别的原因建议都使用SNMP的。
Associated Graph Templates
前面带“ucd/net”的就是能使用ucd-snmp和net-snmp的模板。如:ucd/net - CPU Usage
Associated Data Queries
前面带SNMP的就是能使用snmp的。如:SNMP - Interface Statistics
当然,你还可以从www.cacti.net上找到新的模板或添加自己的模板。
4、怎么备份Cacti和它的数据呀?
只需要备份rra目录和数据库就可以了。你喜欢也可以将log目录一起备份。
如果你自己添加了一些插件的话记得也拷过去。
5、新建的device的Data Query里面的状态总是“ Success [0 Items, 0 Rows]”?
请先确认你的snmpd.conf中的权限设置,是否允许cacti取这些OID的数据。可以使用snmpwalk命令来进行测试,比如:
如果你的snmpd.conf设置没有问题,那可能是下面这种情况:
旧版本的snmpwalk(比如redhat默认安装的5.0.6)缺少一些参数,比如-O中的"U"参数.(可以用snmpwalk --help来查看是否有该参数)。
而cacti-0.86g或以上版本需要这些参数,解决办法是安装一个新的net-snmp包(如:net-snmp5.2.1),从而得到一个新snmpwalk的版本。
6、有图但图例文字不能显示
添加RRDTool默认字体路径
如下图中将路径设置成:/usr/local/rrdtool/share/rrdtool/fonts/DejaVuSansMono-Roman.ttf


发表评论

相关推荐
CentOS5.4下cacti-0.8.7e及相其相关插件的编译与安装
cacti安装与配置详解
RHEL5.5环境下Cacti的安装配置和维护
网络设备监控软件cacti安装与配置方法,centos6.5环境安装。已部署于本单位主控机房。
Centos 5.5环境下Cacti的安装配置和维护
Cacti和Nagios是现在使用比较多的网络监控软件了,对于这两款监控软件的区别,应该说是侧重点的不同。 Cacti比较着重于直观数据的监控,易于生成图形,用来监控网络流量、cpu使用率、硬盘使用率等可以说在合适不过。...
Cacti网络监控工具 Cacti安装配置实践操作整理 ; 监控设置 网络监控
cacti安装与配置,LINUX环境下的搭建步骤,操作命令等
cacti是一款非常优秀的网络监控软件。多的不用说,随便搜一下也有所了解,用了就知道他有多好。
Cacti安装配置完整版,使用yum安装,只需复制粘贴即可成功安装
CentOS系统下Cacti中文版安装配置
教程名称:Cacti安装配置及优化文档教程课程目录:【】cacti 完全文档【】snmpb【开源的MIB浏览器】【】【一】安装配置Cacti Nginx PHP MYSQL【】【三】为Cacti监控添加Cisco路由器【】【二】修改cacti轮询时间精度,...
文档旨在说明Linux 环境下, 网络监控工具CACTI 的安装和基本配置过程及说明。
cacti 在centos 5.4系统想安装详解
cacti安装部署cacti安装部署cacti安装部署cacti安装部署cacti安装部署cacti安装部署cacti安装部署cacti安装部署
cacti安装过程 cacti安装过程 cacti安装过程 cacti安装过程
Cacti安装配置 监控分析工具Cacti的安装配置手册(个人亲测使用版)
CentOS+Cacti安装配置 (很完整且简单..可以试试效果
Cacti 0.8.8b 安装配置(含snmp配置).doc